BIOVIA Discovery Studio Visualizer 2025 Linux (Ubuntu) Installation Guide
- Ege Altun

- Apr 28, 2025
- 4 min read
Updated: Jun 10, 2025
While the Discovery Studio Visualizer (DSV) software can be easily installed on computers running the Windows operating system, its installation on Linux-based systems is slightly more complex. In this article, I will explain how to install DSV on Linux (Ubuntu) computers. You can access all the necessary codes from our GitHub page (https://github.com/insilicodsgn/BIOVIA_DSV/blob/main/README.md?plain=1).

Step 1
First, we need two packages. Let's enter the following commands in the terminal:
sudo apt install binwalk
sudo apt install libpcre2-16-0
Step 2
Register and download the BIOVIA DSV software from the official website:
If you have ad blockers or cookie blockers enabled in your browser, the registration screen on the link I provided may not load properly. Once the download screen appears, fill in your details to access the Linux download file, and then proceed to download it.

The downloaded file will appear in your ‘Downloads’ folder. Once you see the “BIOVIA_DS2025Client.bin” file, open the terminal and enter the following commands in order:
cd Downloads
mkdir BIOVIA_DS2025Client_extracted
cd BIOVIA_DS2025Client_extracted
bash ../BIOVIA_DS2025Client.bin --target . # (Don’t forget the dot at the end!)
Next, we need to run the “install_DSClient.sh” script. However, this script won't work properly without some corrections—because some lines use echoe instead of echo.

To fix the issue, enter the following command:
sed -i 's/echoe/echo/g' install_DSClient.sh
Now, to run the script, use this command:
bash install_DSClient.sh
When prompted, simply press the Enter key. You'll need to press Enter three times in a row. After this step, a folder named BIOVIA will be created in your home directory, and DSV will be installed on your computer. However, since there is no license file yet, the program will not work. The license file is included in the downloaded package. Now we will proceed with the licensing step.
Step 3
Note: From this point on, you need to replace “ege” with your own username. If you’re not sure what your username is, you can find out by typing whoami in the terminal. In the terminal, type: cd
/home/ege/BIOVIA/DiscoveryStudio2025/lp_installer
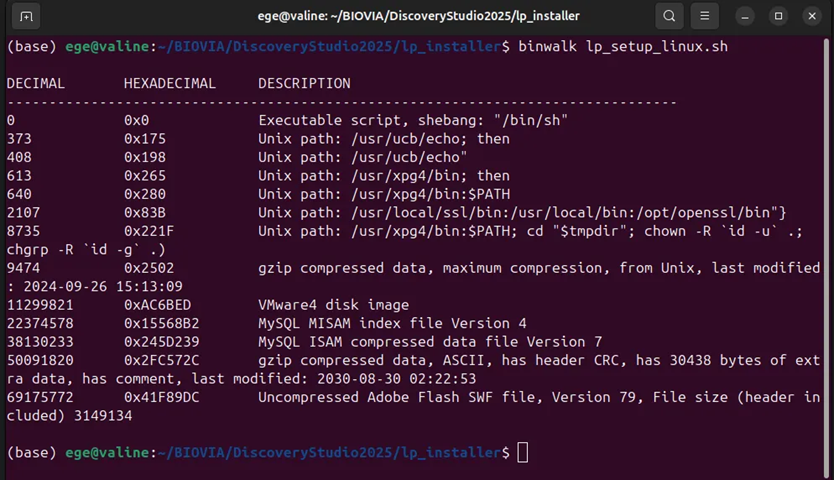
Next, we will extract the license from the “lp_setup_linux.sh” file using “binwalk”. To do this, type: binwalk lp_setup_linux.sh

9474 0x2502 — This line represents the first embedded gzip archive that contains the install_lp.sh script and the license files we need. This will be the same on your system as well. Even if the number is different, it will match the text in the Description column.
Now, to extract the contents of that section using binwalk, run the following command: binwalk -e lp_setup_linux.sh
As shown in the example, 2502 (from 9474 0x2502) indicates the offset where our target file begins.

Next, to navigate to the extracted folder in the terminal, enter the following command — and as a reminder, replace ege with your own username:
cd /home/ege/BIOVIA/DiscoveryStudio2025/lp_installer/_lp_setup_linux.sh.extracted
Then, enter the following commands one by one. If you see a different number instead of 2502, use your number (though it will most likely be the same):
mkdir unpacked_2502
cp 2502.gz unpacked_2502/
cd unpacked_2502
gunzip 2502.gz
tar -xf 2502
As shown in the image, we successfully extracted 2502, and inside it, we found a folder named licensepack.

Now we're writing this code to correct "echoe" to "echo": "sed -i 's/echoe/echo/g' install_lp.sh"
Then to run it: "bash install_lp.sh"
We continue by pressing enter to the questions that appear, we will press enter three times. One step remains for the licensing process, we copy the "libls_license64_g850.so" file from the downloaded file to the installed file by writing this code:
cp /home/ege/BIOVIA/BIOVIA_LicensePack/linux/lib/libls_license64_g850.so ~/BIOVIA/DiscoveryStudio2025/lib/
From now on, DSV will work. If you go to "/home/ege/BIOVIA/DiscoveryStudio2025/bin" and type ./DiscoveryStudio2025 in the terminal, DSV will open. In the rest of the text, I will show how to add an icon to the desktop for easy execution and how to add the DSV icon to the "Show Apps" section in Ubuntu.
Step 4
First, we type "nano ~/BIOVIA/DiscoveryStudio2025/start_ds.sh" in the terminal and enter (let's pay attention to our username):
#!/bin/bash
export LD_LIBRARY_PATH=/home/ege/BIOVIA/DiscoveryStudio2025/lib:$LD_LIBRARY_PATH
/home/ege/BIOVIA/DiscoveryStudio2025/bin/DiscoveryStudio2025
to save, we press ctrl+x followed by Yes and enter to exit. To give execution permission, we type:
chmod +x ~/BIOVIA/DiscoveryStudio2025/start_ds.sh
Then to move the desktop icon to the applications folder, we type this code:
mv ~/Desktop/discoverystudio2025.desktop ~/.local/share/applications/
Next, to add an icon to the desktop:
We type "nano ~/.local/share/applications/discoverystudio2025.desktop". Enter the following exactly as shown (paying attention to our own username):
[Desktop Entry]
Version=1.0
Type=Application
Name=Discovery Studio 2025
Comment=BIOVIA Discovery Studio 2025
Exec=/home/ege/BIOVIA/DiscoveryStudio2025/start_ds.sh
Icon=/home/ege/BIOVIA/DiscoveryStudio2025/share/PluginDescriptors/Icons/Container/appicon.png
Path=/home/ege/BIOVIA/DiscoveryStudio2025
Terminal=false
Categories=Science;Education;
After typing these, we again press ctrl+x, yes and enter to exit.
To copy this file to the Desktop, we type the code:
cp ~/.local/share/applications/discoverystudio2025.desktop ~/Desktop/
Then we give execution permission:
chmod +x ~/Desktop/discoverystudio2025.desktop
After this process, we right-click on the DSV icon on the desktop (which might appear as a broken file with an X mark in the corner) and click on "Allow Launching". This way, the DSV software is installed on our Linux (Ubuntu) system.


Comments